
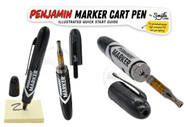
Smyle Labs Permanent Marker Penjamin Manual: Setup, Voltage & Charging Guide
Posted by VapeBatt on Jul 8th 2026
Smyle Labs Product Instructions
Penjamin Permanent Marker 510 Cart Battery Manual
Complete setup, voltage, preheat, charging, cartridge-installation and permanent-marker operating instructions.

Perm. Marker Cart Pen at a Glance
| Battery connection | Standard 510 thread |
|---|---|
| Voltage settings | 2.7V, 3.1V and 3.6V |
| Preheat | Press the firing button twice |
| Power control | Five rapid clicks |
| Charging | USB-C; approximately one hour |
| Cartridge covers | Short and long upper marker shells |
| Writing function | Functional permanent-marker tip |
Table of Contents
- Product Overview
- What Is Included
- Device Parts
- Cartridge Compatibility
- Installing a Cartridge
- Turning the Battery On and Off
- Selecting a Voltage
- Using Preheat Mode
- Activating the Battery
- Using the Permanent Marker
- Charging Instructions
- Cleaning and Maintenance
- Troubleshooting
- Storage and Transportation
- Safety Warnings
- Quick Control Guide
1. Product Overview
The Smyle Labs Permanent Marker is a rechargeable, button-operated 510-thread battery built into a working permanent-marker body. A compatible cartridge attaches to the threaded end of the battery and is covered by one of two included upper marker shells.
The short shell is designed for shorter cartridges, while the longer shell provides additional room for taller cartridge designs. Once assembled, the cartridge remains covered inside the marker-style body.

Main Features
- Standard 510-thread cartridge connection
- Concealed cartridge design
- Short and long cartridge-covering marker shells
- Three adjustable voltage settings
- Low-voltage preheat mode
- Approximately 10-second firing limit
- USB-C charging
- Illuminated firing button and LED indicator ring
- Functional permanent-marker writing tip
2. What Is Included
- 1 Smyle Labs Permanent Marker Penjamin battery
- 1 removable marker cap
- 1 short upper marker shell
- 1 long upper marker shell
- 1 USB-C charging cable
- Product instruction insert

3. Device Parts
Removable Marker Cap
The black marker cap protects the writing tip. Remove it when writing and replace it immediately afterward to help prevent the permanent-marker ink from drying.
Permanent-Marker Writing Tip
The writing end contains a functioning felt marker tip. This is separate from the cartridge and inhalation end of the device.
Battery Body
The main cylindrical body contains the rechargeable battery, firing controls, charging port and 510-thread connection.
Firing Button with LED Ring
The illuminated side button controls power, voltage selection, preheat and manual activation. The surrounding LED ring displays operating and charging status.
USB-C Charging Port
The USB-C port is located on the side of the battery body beneath its protective cover.

510-Thread Connection
The metal threaded connection is located at the end opposite the writing tip. A compatible cartridge screws directly into this connection.
Short Upper Marker Shell
The shorter black shell covers compact cartridges and includes a clip and aroma opening.
Long Upper Marker Shell
The longer shell provides extra clearance for taller compatible cartridges.
4. Cartridge Compatibility
Product packaging indicates compatibility with cartridge capacities ranging from approximately 0.5 g to 4 g. Actual compatibility depends on the cartridge’s physical height, width, mouthpiece and base—not only its stated capacity.
Before installation, confirm that the cartridge:
- Uses a standard 510-thread connection
- Is not cracked, leaking or damaged
- Threads smoothly onto the battery
- Fits inside the short or long marker shell
- Does not block the shell’s airflow opening

5. Installing a 510 Cartridge
- Turn the battery off. Press the firing button five times rapidly.
- Inspect the cartridge. Confirm that it is compatible, undamaged and not leaking.
- Thread the cartridge into the battery. Turn it clockwise until secure.
- Do not overtighten. Stop when the cartridge makes a secure connection.
- Choose the best-fitting shell. Use the short shell for compact cartridges or the long shell for taller cartridges.
- Slide the shell over the cartridge. Make sure it sits securely without pressing against or bending the cartridge.
- Check the airflow opening. Confirm that the aroma opening remains clear.
The selected upper marker shell may remain installed during normal use.
6. Turning the Battery On and Off
Press the firing button five times rapidly to turn the battery on. The LED ring should flash to confirm activation.
Press the button five times rapidly again to turn the battery off.
7. Selecting a Voltage
With the device turned on, press the firing button three times rapidly to cycle through the voltage levels.
| LED Color | Voltage | Heating Level |
|---|---|---|
| Green | 2.7V | Low |
| Blue | 3.1V | Medium |
| Red | 3.6V | High |
Begin with the lowest voltage and increase only when necessary. Higher voltage produces more heat and may consume cartridge contents more quickly.

8. Using Preheat Mode
Press the firing button two times rapidly to activate preheat.
Preheat may help when:
- The cartridge contents are thick
- The cartridge has been stored in a cool environment
- Airflow feels restricted
- The cartridge needs gentle warming before use
Avoid repeated preheat cycles. Excessive heating can thin cartridge contents and increase the possibility of leaking.
9. Activating the Battery
- Confirm that the cartridge and upper marker shell are installed correctly.
- Turn the battery on with five rapid clicks.
- Select the desired voltage with three rapid clicks.
- Place your lips over the aroma opening in the upper marker shell.
- Press and hold the firing button.
- Inhale slowly and gently.
- Release the firing button when finished.
The battery has an approximately 10-second activation limit. When the limit is reached, the indicator light will blink and the battery will stop firing.
10. Using the Permanent Marker
- Remove the black marker cap from the writing end.
- Apply the marker tip to an appropriate writing surface.
- Write normally without pressing excessively hard.
- Replace the cap immediately after use.
Permanent-marker ink may stain clothing, furniture and other surfaces. Avoid contact with eyes, skin and mouth.
11. Charging Instructions
- Turn the battery off.
- Open the protective cover over the USB-C port.
- Insert the USB-C connector into the battery.
- Connect the cable to a suitable USB power source.
- Place the battery on a clean, dry and heat-resistant surface.
The LED glows red while the battery is charging. A full charge takes approximately one hour.
- Do not charge overnight.
- Do not use a damaged charging cable.
- Do not charge a wet, swollen, leaking or unusually hot battery.
- Keep the USB-C port free of dust, oil and moisture.
- Disconnect the charging cable after charging is complete.
12. Cleaning and Maintenance
Cleaning the 510 Connection
- Turn the battery off.
- Remove the upper marker shell.
- Unscrew the cartridge.
- Inspect the connection for oil or residue.
- Wipe it with a clean, dry cotton swab.
- For stubborn residue, lightly dampen the swab with isopropyl alcohol.
- Allow the connection to dry completely before reassembly.
Cleaning the Marker Shells
Wipe the inside and outside of each marker shell with a clean cloth. Make sure the aroma opening remains unobstructed.
Battery Care
- Do not immerse the battery in water.
- Do not rinse it under running water.
- Do not insert metal objects into the threaded connection or charging port.
- Do not use abrasive cleaning products.
- Do not disassemble the battery.
13. Troubleshooting
The Battery Will Not Turn On
- Press the firing button five times rapidly.
- Recharge the battery.
- Check the firing button for damage or obstruction.
The Cartridge Produces No Vapor
- Confirm that the battery is turned on.
- Remove and reinstall the cartridge.
- Clean the cartridge and battery contact points.
- Try another voltage setting.
- Test another compatible cartridge.
The Indicator Light Blinks
The device may have reached its 10-second activation limit. Release the button and allow the battery and cartridge to rest briefly.
Blinking can also indicate a cartridge connection or battery problem. Remove the cartridge, clean the contacts and reinstall it without overtightening.
The Cartridge Does Not Fit Inside the Shell
- Try the longer upper marker shell.
- Confirm that the cartridge is installed straight.
- Check for an oversized mouthpiece or unusually wide tank.
- Do not force the shell over the cartridge.
The Cartridge Tastes Burnt
- Switch to the green 2.7V setting.
- Use shorter activations.
- Allow more time between draws.
- Avoid repeated preheat cycles.
The Cartridge Is Clogged
- Activate preheat once.
- Take a slow, gentle draw.
- Make sure the aroma opening is clear.
- Keep the cartridge upright when possible.
The Battery Will Not Charge
- Make sure the USB-C cable is fully inserted.
- Try another compatible cable.
- Try another suitable USB power source.
- Inspect the charging port for dust or debris.
- Stop using the device if the port is damaged or loose.
14. Storage and Transportation
- Turn the battery off.
- Replace the cap on the marker tip.
- Confirm that the cartridge-cover shell is secure.
- Keep the device away from keys, coins and other metal objects.
- Store it upright when possible.
- Keep it away from moisture, direct sunlight and excessive heat.
Do not leave the device inside a parked vehicle or expose it to temperatures exceeding 100°F.
15. Safety Warnings
- Not for sale to minors.
- Intended for adults age 18 and older.
- Keep out of reach of children and pets.
- Small parts may present a choking hazard.
- For aromatherapy use only.
- Not intended for tobacco or nicotine use.
- Do not expose the device to temperatures exceeding 100°F.
- Do not expose the battery to water, fire or extreme heat.
- Do not puncture, crush, bend or disassemble the battery.
- Do not use a swollen, leaking or damaged battery.
- Do not leave the device charging unattended.
- Do not charge it in a vehicle.
- Do not use the battery while it is charging.
- Do not overtighten the cartridge.
- Replace the marker cap after writing.
- Avoid marker-ink contact with eyes, skin and mouth.
- Do not place the writing end in your mouth.
16. Quick Control Guide
| Function | Control |
|---|---|
| Turn on or off | Press the firing button 5 times rapidly |
| Change voltage | Press the firing button 3 times rapidly |
| Start preheat | Press the firing button 2 times rapidly |
| Activate cartridge | Press and hold the firing button |
| Low voltage | Green — 2.7V |
| Medium voltage | Blue — 3.1V |
| High voltage | Red — 3.6V |
| Maximum activation | Approximately 10 seconds |
| Charging connection | USB-C |
| Charging indicator | Red LED |
| Approximate charge time | About 1 hour |
Penjamin Marker Setup Summary
- Charge the battery before first use.
- Turn the battery off.
- Thread a compatible 510 cartridge into the connection.
- Select the short or long upper marker shell.
- Slide the selected shell over the cartridge.
- Press the firing button five times to turn the battery on.
- Press three times to select a voltage.
- Press twice to activate preheat when needed.
- Press and hold the button while inhaling through the aroma opening.
- Turn the battery off after use.